Get Those Claws Out
Thursday 19th August 2015
|
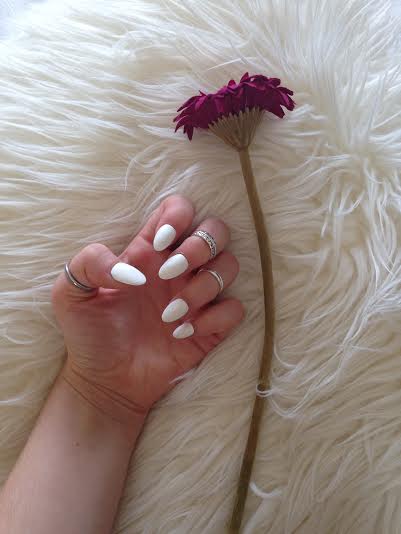
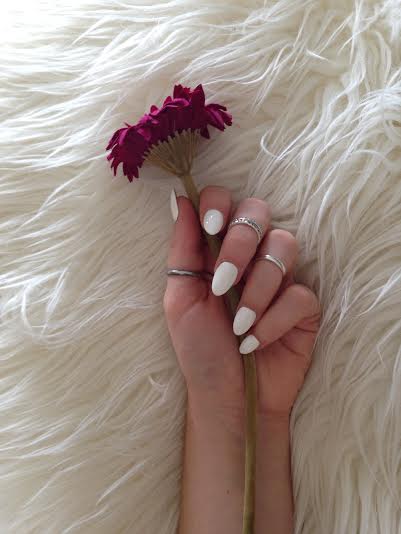
I recently went to get some acrylic nails done in my local nail bar to hide my severely bitten nails. I was looking to get a summery style and an on-trend shape so rather than going for a custoery coral or pastel coloured square shape, I opted for white nail varnish on an oval shape nail. The colour is perfect for summer as it is bold and looks great with a tan but the best thing is it goes with every outfit as it is so neutral. I am also very pleased with the shape as the nails look more natural yet they just look a little more bad-ass. I find it strange how just the shape of a nail can somewhat empower you but I really do feel more confident when I have these nails.
|
|
|
Acne Coverage
Tuesday 28th July 2015
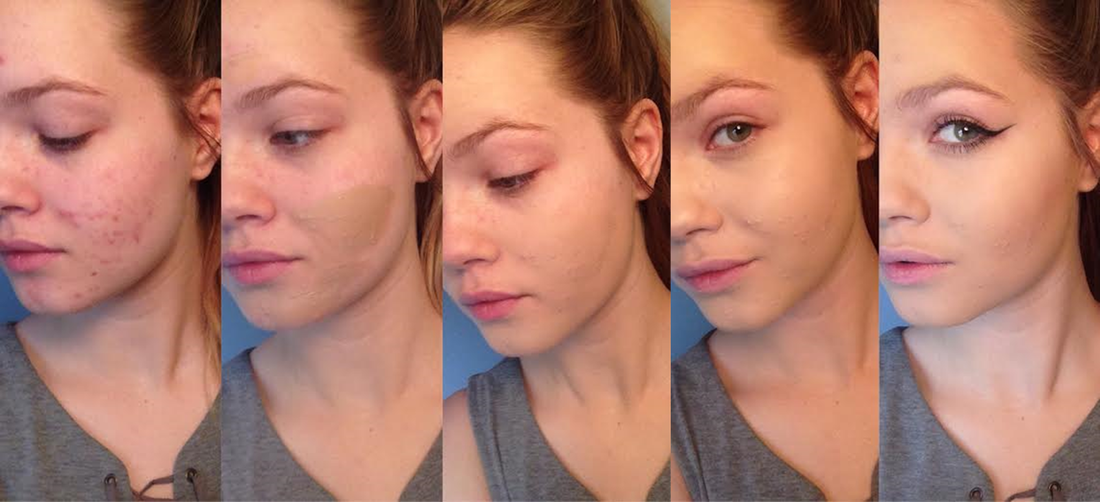
As you can see from my first picture I have quite bad acne and scaring. However, after many years of trial and error, I have thankfully worked out the perfect way to cover this up. So here is my step by step solution to cover up acne:
1. First I take my Maybelline SuperStay 24Hr Concealer in a similar shade to my foundation and rather than dotting it onto each individual imperfection, instead I smear it over the problem area.
2. Next I take my Beauty Blender to buff the concealer into my skin and even out the redness.
3. After I have blended my concealer properly I then go in with my foundation which is the 1,2,3 Perfect Foundation from Bourjois. This is perfect as it is quite high coverage and has three correcting pigments in yellow, mauve and green. This conceals dark circles, dullness and redness. Another advantage of this foundation is that is is non comedogenic meaning it lets skin breathe to avoid blocked pores.
4. Finally I set my foundation with my Rimmel Stay Matte Pressed Powder, add bronzer and finish the rest of my eye makeup.
Summer Beauty Essentials
Friday 26th June 2015
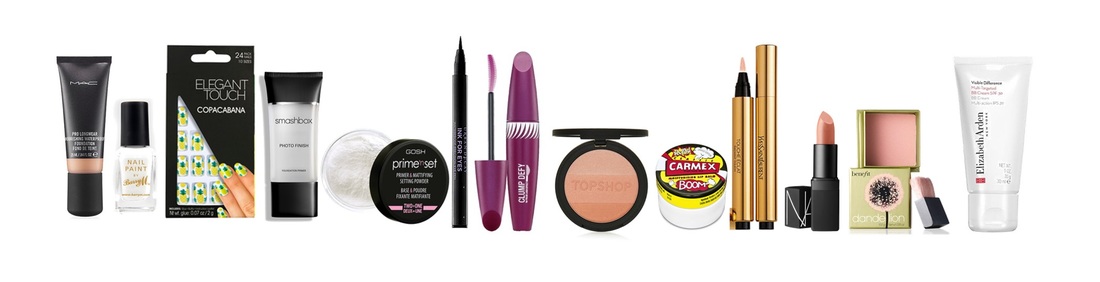
Summer is supposed to be pretty much in full swing by now but unsurprisingly in England this isn't the case. However, this means that it's not too late to stock up on the top beauty must-haves for the supposedly sunny season! I have collated my favourite summer makeup products to share with you and so hopefully you can avoid the unwanted sliding foundation and printed eye-makeup look. (products from left to right)
1.Mac Pro Longwear Nourishing Waterproof Foundation, 2.Barry M Nail Paint Matte White, 3.Elegant Touch Trend Copa Cabana, 4.Smashbox Photo Finish Foundation Primer, 5.Gosh Prime n Set Powder, 6.Urban Decay Ink For Eyes Waterproof Precision Eye Pen, 7.Max Factor Clump Defy Water Resistant Volumising Mascara, 8.Topshop Bronzing Illuminator in Reflect, 9.Carmex Limited Edition Moisturising Lip Balm, 10.Yves Saint Laurent Touche Éclat, 11.Nars Honolulu Honey Satin Lipstick, 12.Benefit Dandelion Powder, 13.Elizabeth Arden Visible Difference Multi-Targeted BB Cream SPF 30
1.Mac Pro Longwear Nourishing Waterproof Foundation, 2.Barry M Nail Paint Matte White, 3.Elegant Touch Trend Copa Cabana, 4.Smashbox Photo Finish Foundation Primer, 5.Gosh Prime n Set Powder, 6.Urban Decay Ink For Eyes Waterproof Precision Eye Pen, 7.Max Factor Clump Defy Water Resistant Volumising Mascara, 8.Topshop Bronzing Illuminator in Reflect, 9.Carmex Limited Edition Moisturising Lip Balm, 10.Yves Saint Laurent Touche Éclat, 11.Nars Honolulu Honey Satin Lipstick, 12.Benefit Dandelion Powder, 13.Elizabeth Arden Visible Difference Multi-Targeted BB Cream SPF 30
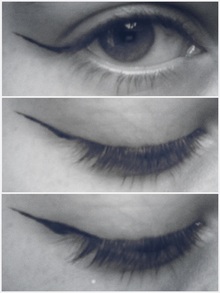
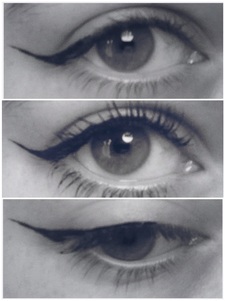
Cat Eye-How to...
Wednesday 10th June 2015
Anybody who knows me will know that my winged eyeliner is my everyday makeup must! I often get asked how I create the cat eye look so I thought it would be fitting to make my first beauty blog post an eyeliner "how to". So here goes...
|
1. Take your eyeliner (I use the Barry M Liquid Eyeliner) and then draw a diagonal line from the edge of your eye at an angle. A tip is to draw the line as if you were going to connect the edge of your eye to the end of your eyebrow (shots 1&2)
2. Next, starting halfway down the line you've just drawn pull the eyeliner into the lash line a liitle more to create the desired flick. This can be as thick or thin as you want-some people like the Amy Winehouse look but I prefer to keep the flick fairly thin (shots 3&4) |
|
|
3. To complete the winged eyeliner look connect the flick to the rest of the eye by closely lining your lash line and finish the line around the mid point of your eye to make your eyes appear wider (shots 5&6)
